Soft Sourdough Bread
Soft and chewy Sourdough Bread that is perfect as an everyday bread.
Equipment
- Large bowl
- Kitchen Scale or measuring cups/spoons
- Danish whisk or wire whisk
- Bread Lame or small sharp knife
Ingredients
- 310 grams water
- 100 grams active sourdough starter
- 10 grams salt 1 tsp
- 12 grams olive oil 1 tbsp
- 15 grams honey 1 tbsp
- 500 grams bread flour 4 cups
Instructions
Step 1 - Mix Wet Ingredients
- In a large bowl, use a wire whisk to mix wet ingredients and salt together. Whisk to incorporate the starter thoroughly - it will look milky.
Step 2 - Add Flour Then Autolyse
- Using your hands, gently mix the flour into the wet mixture. I like to use a slow, circular motion to gradually incorporate the flour until the dough comes together, picking up the dry bits at the bottom and around the bowl. It will be slightly moist and shaggy—this is exactly what you want.
- Cover the bowl with a towel and let the dough rest for 1 hour. This step is called Autolyse—it gives the gluten a head start in developing, which helps create a strong, elastic dough.
Step 3 - Pull & Folds
- Now it’s time to build structure in the dough with four sets of stretch and folds, spaced 30 minutes apart.Example:5:00 PM – Mix the dough, cover, and let rest (autolyse)6:00 PM – First stretch and fold - cover6:30 PM – Second stretch and fold - cover7:00 PM – Third stretch and fold - cover7:30 PM – Final stretch and fold - cover and store for Bulk FermentationStretch and Fold technique:Uncover the dough and lightly wet your hands. Grab one side of the dough, gently pull it up to stretch it, and fold it over the center. Rotate the bowl a quarter turn and repeat. Do this all the way around the bowl. Cover again and rest for 30 minutes. Repeat this process three more times. You will feel the dough starting to strengthen throughout the stretch and folds.After the last fold, cover the bowl and let it rest in a warm, draft-free place for 8–10 hours. This phase is called bulk fermentation or the first proof. If your kitchen is warm or humid, fermentation may happen faster (as quick as 6 hours in some cases).
Step 4: Shape the Dough
- Prepare your proofing bowl or banneton basket by heavily dusting the inside with flour. I recommend using rice flour—it doesn’t absorb into the dough as easily and helps prevent sticking.
- Turn your dough out onto a lightly floured surface. Gently stretch it into a rough rectangle. Fold the left and right sides into the center, then roll it from top to bottom into a loose log. Tuck the edges under as you roll to create surface tension.With the seam-side down, tighten the dough by gently pulling it toward you on the countertop. Turn it a quarter turn and repeat this motion 4–5 times until the dough feels taut and smooth.For a final seal, use a bowl scraper to gently scoop under and rotate the dough 3–5 times.Place the shaped dough seam-side up into your prepared proofing basket. Cover with a floured towel or the basket’s cloth cover. Let it rest in your proofing area for another 8–10 hours. (Note: in hot or humid weather, it may fully proof in as little as 2 hours.)
Step 5: Bake
- If you’re using a Dutch oven, place it inside your oven and preheat to 450°F.
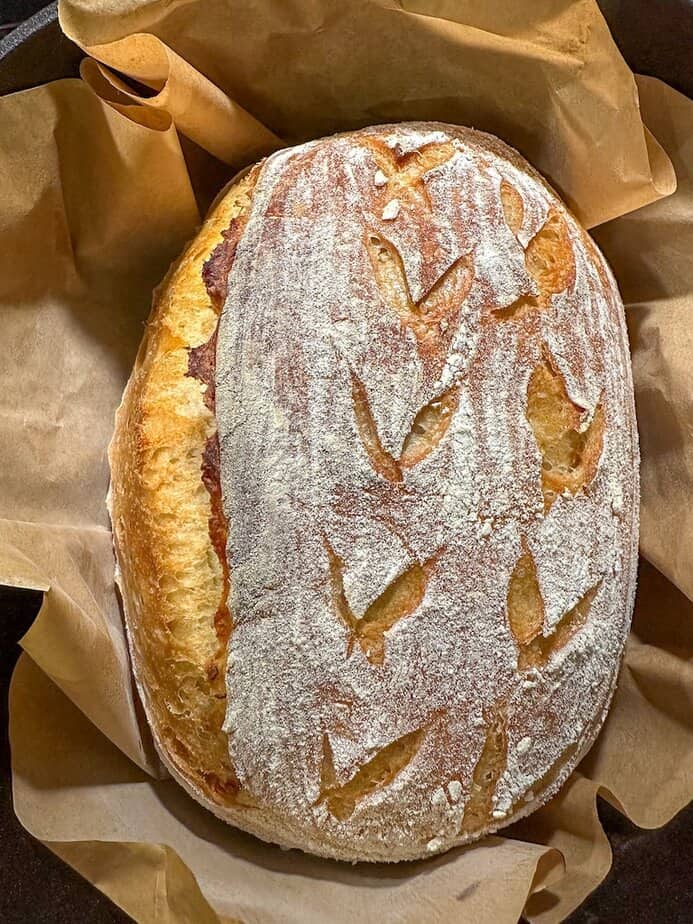
- While the oven heats, carefully flip the dough out of the basket onto parchment paper. Dust off any excess flour. Use a bread lame, scissors, or a sharp knife to score the top. This not only helps the bread expand properly in the oven—it’s also where you can have fun with creative designs!
- Once the oven is ready, use the parchment to lift the dough into the hot Dutch oven. Cover with the lid and bake for 20 minutes. Then remove the lid, reduce the temperature to 400°F, and bake for another 25 minutes, until the crust is golden and crisp.
- Transfer to a wire rack to cool.Once cooled, serve and Enjoy!
Notes
Storage
Store cooled bread in a re-usable bread bag or large ziplock bag for up 5 days at room temperature, 1 week if stored in the refrigerator, and 3 months if stored in the freezer. * It's important to remember that homemade bread has no preservatives, which is good! But this also means that it will mold quicker than store-bought.
Nutrition
Serving: 12gCalories: 175kcalCarbohydrates: 34gProtein: 5gFat: 2gSaturated Fat: 0.3gPolyunsaturated Fat: 0.4gMonounsaturated Fat: 1gSodium: 325mgPotassium: 43mgFiber: 1gSugar: 2gVitamin A: 1IUVitamin C: 0.01mgCalcium: 7mgIron: 0.4mg
Tried this recipe?Let us know how it was!