To bake sourdough bread, you need an active sourdough starter—and creating one is so much easier than you might think! All it takes is two simple ingredients that you probably already have in your kitchen: flour and water. In this post, I’ll walk you through how to make a sourdough starter from scratch in simple and easy steps. With just a little patience, you’ll have a bubbly, active starter ready to bake in about 7–14 days.
What is a sourdough starter?
A sourdough starter is a mixture of flour and water that ferments over time, thanks to natural wild yeast and good bacteria from the flour and your environment. These natural yeasts and bacteria begin the fermentation process, which gives sourdough its signature tang and rise. This magical mix becomes the leavening agent for your bread—it replaces commercial yeast and helps your dough rise naturally.
How long does it take to make a starter?
Every starter has its own timeline, usually becoming active within 7–14 days. I know that’s a bit of a range, but you’re growing something alive! The timeline depends on factors like room temperature and humidity. My first starter, Henry (yes, I named him), took 13 days to fully come to life—and I still remember when he bubbled up and overflowed the top of the starter jar – it was the best feeling! And then making my first loaf of sourdough bread was magical!
Ingredients and Equipment
Flour: you will need both unbleached all-purpose flour and either a whole-grain wheat flour or whole grain rye flour. It is important to use unbleached flour as bleached flour does not have those natural yeasts or good bacteria that makes a starter form and grow. Organic flour is best when creating your starter as it has all of those good bacteria and natural wild yeast.
Personally, I like to use King Arthur flour, as it provides consistent results for my bread and it’s local to my area. However, there are many brands that are excellent.
Water: Filtered water is important, especially if you’re on city water, as chlorine and other additives can inhibit or interfere with the fermentation process. A Brita filter or refrigerator filter works well. In a pinch, bottled water is fine too. If you water has chlorine in it, you can fill a jar with water and let it sit out uncovered overnight. The chlorine will dissipate, however if there are other additives in the water then this will not work. In this case, filtered water is best.
Clean jar and cover: any clean glass jar that is large enough for your starter to grow. It will double or triple is size so keep that in mind. I use a quart-size, wide-mouth canning jar or tulip-shaped Weck jar, as they provide enough room for growth. You will also need a jar cover: a loose lid, coffee filter, or cheesecloth secured with a rubber band works perfectly fine.
Wooden spurtle or spoon, spatula: I use a wooden spurtle which is a thin long flat Scottish kitchen tool used to stir sauces and is excellent for fitting into jars. But you can also use the long end of a wooden spoon or a spatula that can fit inside a jar.
How to Make a Sourdough Starter
For this process that I am walking you through, you do not need a kitchen scale. Many will recommend using one. However, I’ve made several starters by using measuring cups. With that said, once your starter is ready, I do recommend a scale for making sourdough bread.
Let’s begin!
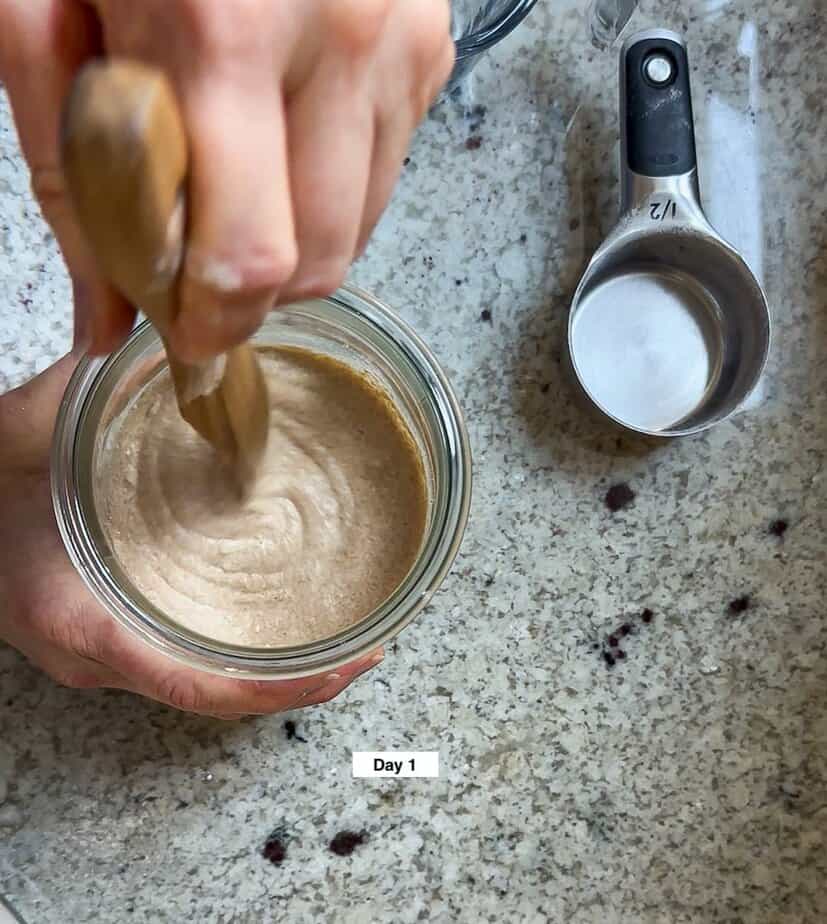
Day 1
In your clean jar, combine:
- ½ cup whole wheat flour
- ½ cup filtered water
Using wooden spurtle or spatula, stir until smooth—like pancake batter—and mark the starter level with a rubber band or marker. Cover jar loosely to allow air to expand and place the jar in a warm place out of direct sunlight, ideally around 75°F. – You will cover and store the jar this way throughout the entire process.
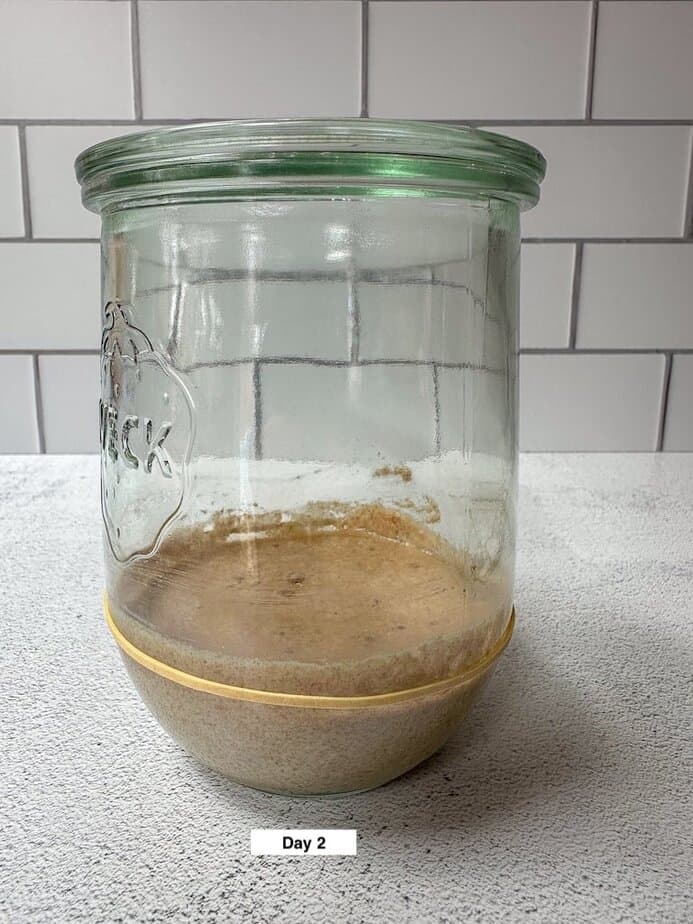
Day 2
You may not see much yet—that’s okay! Discard half the starter and feed it:
- ½ cup whole wheat flour
- ½ cup (or a little less) filtered water
Mix until smooth. Cover jar loosely and place the jar in a warm place out of direct sunlight, ideally around 75°F. You might need to adjust the water and add a little less water than 1/2 cup as you don’t want it to be too thin, you want a texture similar to batter. If you need to add a bit more flour because it is too thin than that is OK. Note: this will be true throughout the entire process.
You might see tiny bubbles—an early sign of the fermentation process.
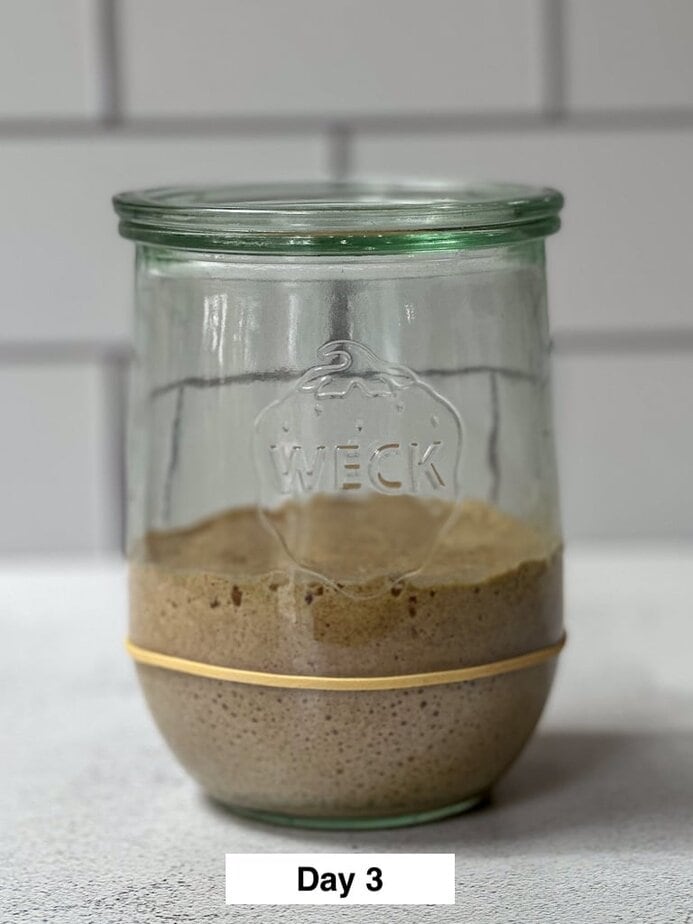
Day 3
Repeat yesterday’s feeding. You might notice more bubbles and a little rise above your rubber band marker. That’s your starter beginning to become alive!
Would you like to save this?
Day 4
Switch to feeding with unbleached all-purpose flour:
- Discard ½ the starter
- Add ½ cup all-purpose flour + ½ cup filtered water
Mix until smooth. Cover jar loosely and place the jar in a warm place out of direct sunlight, ideally around 75°F.
Days 5–7
Start feeding your starter twice a day (about every 12 hours):
- Discard ½ the starter
- Add ½ cup all-purpose flour + ½ cup filtered water
Mix until smooth. Cover jar loosely and place the jar in a warm place out of direct sunlight, ideally around 75°F.
For best results, feed your starter at the same time each day.
If your starter is not ready by day 7, then continue same process as day 5-7 until your starter becomes active. This can take up to 14 days.

How do I know when my starter is ready?
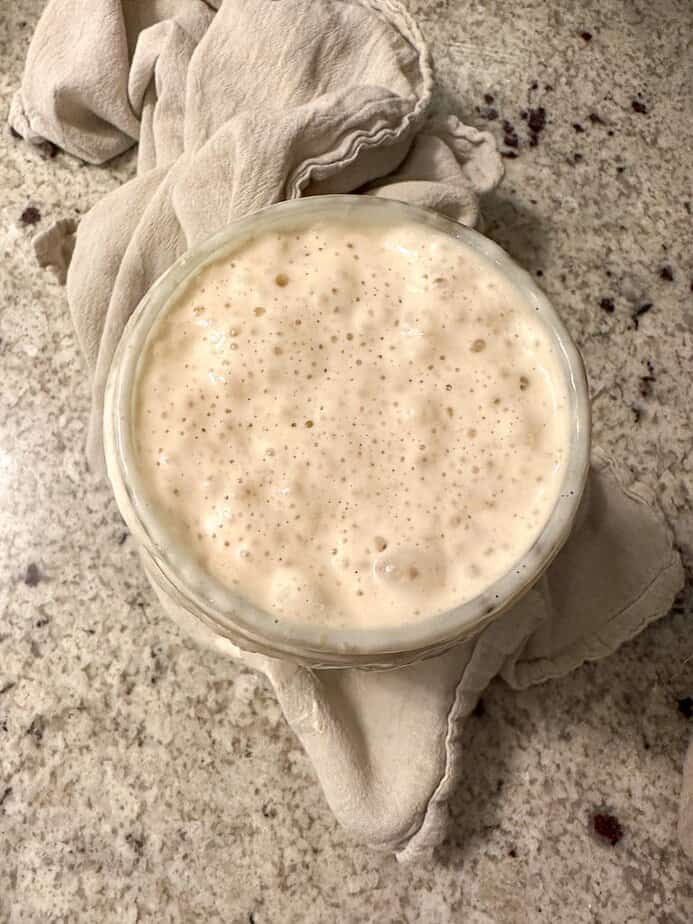
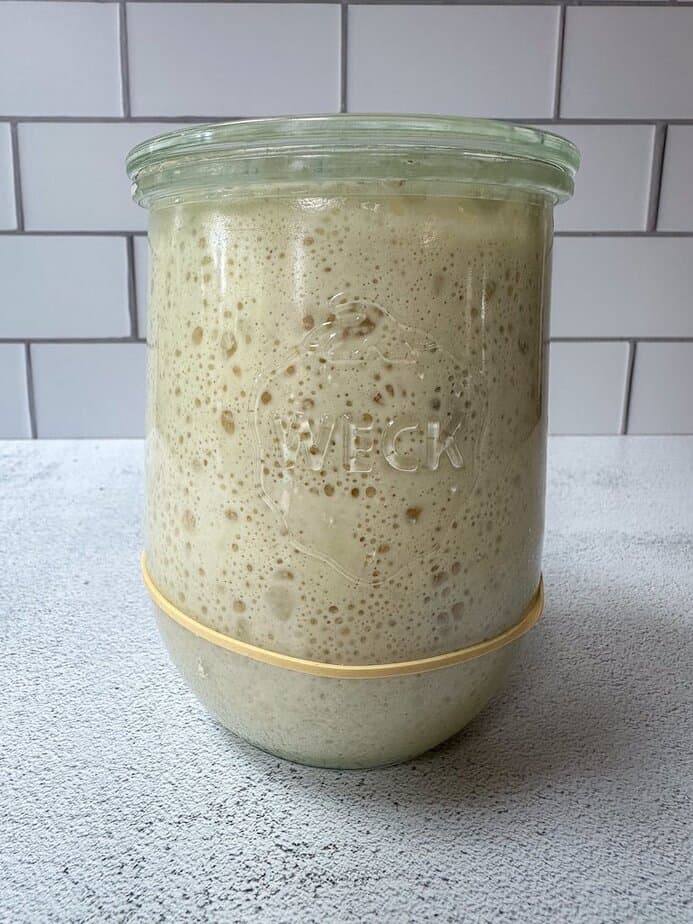
Your starter is ready when there are lots of bubbles in the starter and it doubles in size. See picture above 👆 – bubbly, foamy texture. It’s like magic, overnight (or during the day) it will bubble-up. If you don’t catch it in time it will bubble up over the sides, which I have had happen a few times. It’s kind of fun when that happens, especially if you have little kids in the house as they love to see it erupt like a volcano!
Another way to know that your starter is ready is do what is called the Float Test. This is done by filling a cup or bowl with water. Then take a small scoop of starter and add it to the water. If it floats it’s active and ready to use. If it falls to the bottom or only partially floats, then it is not quite ready and give it another feeding or two.
Tips
- Keep it warm: For best results, and particularly if your kitchen counter tends to run cold, I would recommend keeping your starter jar on a towel to keep it warm. This is particularly important when first making your starter. Cool temps will slow the fermentation process. Some recommend a warming mat. I personally have never used one as I’ve done quite well just using a kitchen towel to rest the jar on. If it’s really cool in my kitchen, I will also wrap another towel around the jar to keep it warm.
- What if I skipped a feeding? Don’t worry, if it has only been 1 or 2 feedings, it’s perfectly fine. Simply fed it and get it back on schedule. If you have gone more than a few feedings and your starter now smells funky, has mold or has a pink/orange discoloration, then I would discard and start again. This is the case if you notice this at any point with your starter. A more mature starter is a bit more forgiving with it’s feedings, but will be at it’s best if fed on a consistent, routine basis.
- What is the brown layer that has formed on top of the starter? Don’t panic if you see a thin brown layer of liquid on top of your starter. This is called “hooch” and it can have a strong odor such as rubbing alcohol or a vinegar-like smell. This is just a by-product of fermentation and means that your starter is hungry. You can either pour it off or stir it in, and then give your starter a feeding.
- Name your starter – I know this sounds silly, but it truly does help with remembering to feed it. I named mine Henry.
- Sourdough Discard: below are ways to use your discard. But if you are going to toss it, either compost it or place it in the garbage. It is not recommended to pour to the drain as it is thick, sticky, and can gum up or block your pipes, which is never good!
- Clean jar: Over time, the jar will start to get crusty with starter, no matter how good you are about scraping down the sides or wiping it with a cloth. Therefore, I transfer my starter to a clean jar about once a month or so. You will be able to tell when it needs changing as bits of the starter will harden around the top edges.
As your starter matures, it will start to produce more consistent results. The bread dough comes together more easily, and your bread will most likely get more lift. My first few loaves were quite flat. But as time went on, my starter got stronger and my bread making skills become more proficient yielding better results. My point in this is – it takes time and a little patience to develop that perfect loaf, but it is completely achievable and once you get there you will never go back to store-bought bread again!!
Caring for your starter
At room temperature – feed daily: if you bake frequently throughout the week you may want to keep it on the counter at room temperature. This way it will be active and ready. You will need to feed in daily and possibly twice per day depending how the starter rises and falls, which can vary with temperature and seasons.
In the refrigerator – once per week: If you bake only once or twice per week, then storing your starter in the refrigerator might be best for you. Feed your starter once per week and keep it stored in the refrigerator. This will slow the activity process of your starter while keeping it fed and healthy. You don’t need to bring it to room temperature before feeding. Simply take it out of the refrigerator, feed it, and place it back in the refrigerator.
One note when keeping it in the refrigerator – when you are ready to use, take it out of the fridge and allow it to come to room temperature. This will wake the starter up as refrigerating it slows it down so you want to go it going and active. For example, I bake on Friday’s, therefore I will take my starter (Henry) out of the refrigerator either in the morning. Or if I’m making a big batch I will take it out on Thursday night and give it a good feeding to get it nice and active by the morning.
To keep your starter strong and healthy, you will want to add whole wheat or rye flour every 3-4 feedings, as wheat and rye flours provide more nutrients than all-purpose and help keep the fermentation process active. Adding rye or wheat flour to your starter is like giving it a dose of multivitamin. I will use a combination of 50% rye or wheat and 50% all-purpose every couple of feedings. Because I keep mine in the refrigerator, this ends up being every 3-4 weeks.
Can I save my discard?
When you first begin the process, your discard is not formed enough to use in recipes. However, after your starter has become active, you can use in many different recipes, such as sourdough pancakes, crackers, English muffins, dinner rolls and so much more!
There is nothing like your first starter! I hope you find this post about how to sourdough starter from scratch and the instructions helpful as you enter the world of Sourdough! If you have any questions, please leave a comment below or contact me through my Contact Page! Would love to hear from you!
Check out this Soft Sourdough Bread, and other “How To” and from scratch recipes here.
As a disclaimer, this post may contain affiliate links by which I may receive a small commission. All product links are items I personally use in my kitchen. Please see Terms of Use for Affiliate Policy.
How to Make a Sourdough Starter From Scratch
Equipment
- Clean jar and cover
Ingredients
- 1½ cups whole wheat flour
- all-purpose flour, unbleached
- filtered water
Instructions
Day 1
- Add ½ cup whole wheat flour and ½ filtered water to the clean glass jar. Stir until smooth—like pancake batter—and mark the starter level with a rubber band or marker. Cover jar loosely to allow air to expand and place the jar in a warm place out of direct sunlight, ideally around 75°F. **You will cover and store the jar this way throughout the entire process.
Day 2
- Discard ½ of the starter and add ½ cup whole wheat flour and ½ cup filtered water,(or a little less). You don't want it to be too thin, you want a texture similar to batter. Mix until smooth. **You might need to adjust the water and add a little less water than ½ cup as you don't want it to be too thin, you want a texture similar to batter. If you need to add a bit more flour because it is too thin than that is OK. Note: this will be true throughout the entire process. Cover jar loosely to allow air to expand and place the jar in a warm place out of direct sunlight, ideally around 75°F.You might see bubbles starting to form which is indicative of the fermentation process which is what you want. But if not, don't worry it can take a couple days for bubbles to form.
Day 3
- Discard ½ of the starter and add ½ cup whole wheat flour and ½ cup filtered water. Stir until smooth. Cover jar loosely and place the jar in a warm place out of direct sunlight, ideally around 75°F.Again, you might start to see some bubbles forming and possibly a little lift to the starter, meaning it might have risen about where you marked the jar.
Day 4
- Switch to feeding with unbleached all-purpose flour: Discard ½ of the starter and add ½ cup all-purpose flour and ½ cup filtered water. Stir until smooth. Cover jar loosely and place the jar in a warm place out of direct sunlight, ideally around 75°F.
Day 5- 7
- Start feeding your starter twice a day (about every 12 hours): Discard ½ of the starter and add ½ cup all-purpose flour and ½ cup filtered water. Stir until smooth. Cover jar loosely and place the jar in a warm place out of direct sunlight, ideally around 75°F.
- If your starter is not ready by day 7, then continue same process as day 5-7 until your starter becomes active.
- Your starter is ready when there are lots of bubbles in the starter and it doubles in size, and has a bubbly, foamy texture. See note below for Float Test.
- Your starter is now ready!! Happy Sourdough Baking!!